Archive
Juking the stats – WordPress and social proof

“Unnecessary Math” – via slaya771 on reddit http://www.reddit.com/r/funny/comments/1d3zs9/unnecessary_math/
Everyone with a basic science education knows that you cannot add quantities whose units do not match; you cannot add population to elevation, for instance, as the picture shows.
This does not stop companies from doing something that’s arguably worse, as it’s harder to detect and call them on their BS.
Take WordPress.com. I use them as my blogging platform and I’m overall happy with them. WordPress allows you to customize your blog by inserting widgets. I have the “Follow Blog: Email Subscription” widget installed. Here is what it looks like to readers:

Here is what readers who are not email subscribers saw
This number is a lie. In my stats page I can see the truth – there are really only 41 email subscribers. The rest are following me on Twitter. When I post on WordPress, it automatically sends a tweet with a link to the post.

Only 41 email subscribers, NOT 220.
WordPress adds my Twitter follower count to my email subscriber count, and then implies that all of them are following my blog via email. Read the wording again. “Join 220 other followers”, right above a text box for email address entry.
First, why would WordPress do this?
I see two main possibilities.
One, it’s an honest mistake. The backend system has some field for ‘followers’ which is always computed by summing up all the different follower types, and this field was inadvertently used rather than the email follower count. I tried to contact WordPress about this on Monday, August 25, 2014 but have not yet received a response.
The second possibility is that it’s deliberate. The subscriber count is a form of social proof, which lets readers gauge the quality of the site. My hypothesis is that WordPress has empirical evidence that a higher number of followers displayed in this widget leads to increased follow rate. You could imagine A/B experiments where some visitors see the true count, and the others see the value doubled, and measure the difference. Or conversely, take away the follower count from that text and see if the follow rate drops.
The second question is, why does it matter?
While it’s not as wrong as adding elevation to population, as the image that started this post shows, it’s still wrong. The units are right in the sense that you are adding counts of people to counts of people. But all followers are not created equal. People could follow me on Twitter for any number of reasons, while not caring at all about my blog. Conversely, people who choose to explicitly sign up for email notifications of new posts are showing a drastically different level of intent. To call them both followers and to insert them in a widget that purports to show email subscribers is disingenuous.
Fortunately the widget has an option to disable the follower count altogether, and from now on I am going to do just that.
How to download your WordPress.com stats in CSV, JSON, or XML format
I wanted raw data about the popularity of my various posts on this blog to better determine what sort of topics I should post about. WordPress.com provides some nice aggregate stats, but I wanted more. After stumbling around the Internet for awhile, I cobbled together a way to download my blog data in either CSV, XML, or JSON format.
There are three steps:
- Get an API key
- Get your blog URL
- Construct the URL to download the data
Get an API key
Akismet is WordPress.com’s anti-spam solution. Register for an Akismet API key at http://akismet.com/wordpress/ by clicking on “Get an Akismet API key”.
Sign up for an account. If you choose the personal blog option, you can drag the slider all the way to the left and register for free. If you value the service that Akismet provides, you can pay more. When you complete the signup flow, you will be provided with a 12 digit ID. Copy this down.
Get your blog URL
Copy the full URL of your blog, minus the leading https://. For me this is developmentality.wordpress.com.
Construct the URL
There is a limited API for downloading your data at the following URL:
http://stats.wordpress.com/csv.php
View this in a browser to see what the API parameters are.

Construct the url
http://stats.wordpress.com/csv.php?api_key=<api_key>&blog_uri=<blog_uri>
View this URL in the browser (or via wget / curl) and you should see the view data.

There are multiple data sources. From the documentation:
table String One of views, postviews, referrers, referrers_grouped, searchterms, clicks, videoplays
Here is some sample data from each table. Change the format param from csv to json or xml to get the data in different formats.
views
CSV
"date","views"
"2013-12-31",118
JSON
[{"date":"2010-02-05","views": 46}]
XML
<views>
    <day date="2014-01-01">112</day>
</views>
postviews
CSV
"date","post_id","post_title","post_permalink","views"
"2014-01-28",369876479,"Three ways of creating dictionaries in Python","https://developmentality.wordpress.com/2012/03/30/three-ways-of-creating-dictionaries-in-python/",46
JSON
[{"date":"2014-01-29","postviews":[{"post_id":369876479,"post_title":"Three ways of creating dictionaries in Python","permalink":"http:\/\/developmentality.wordpress.com\/2012\/03\/30\/three-ways-of-creating-dictionaries-in-python\/","views":22},{"post_id":369875635,"post_title":"R - Sorting a data frame by the contents of a column","permalink":"http:\/\/developmentality.wordpress.com\/2010\/02\/12\/r-sorting-a-data-frame-by-the-contents-of-a-column\/","views":16}]}]
XML
<postviews>
    <day date="2014-01-30"></day>
    <day date="2014-01-29">
        <post id="369876479" title="Three ways of creating dictionaries in Python" url="https://developmentality.wordpress.com/2012/03/30/three-ways-of-creating-dictionaries-in-python/">54</post>
    </day>
</postviews>
referrers
CSV
"date","referrer","views"
"2014-01-28","http://www.google.com/",63
JSON
[{"date":"2014-01-30","referrers":[]},{"date":"2014-01-29","referrers":[{"referrer":"http:\/\/www.google.com\/","views":66},{"referrer":"www.google.com\/search","views":27},{"referrer":"www.google.co.uk","views":10}]}]
XML
<referrers>
    <day date="2014-01-30"></day>
    <day date="2014-01-29">
        <referrer value="http://www.google.com/" count="" limit="100">66</referrer>
    </day>
</referrers>
referrers_grouped
CSV
"date","group","group_name","referrer","views"
"-","Search Engines","Search Engines","http://www.google.com/",1256
JSON
[{"date":"-","referrers_grouped":[{"referrers_grouped":"Search Engines","views":{"http:\/\/www.google.com\/":1305}}]}]
XML
<referrers_grouped>
    <day date="-">
        <group domain="Search Engines" name="Search Engines">
            <referrer value="http://www.google.com/">1305</referrer>
        </group>
    </day>
</referrers_grouped>
Dates aren’t included so it’s the sum over the past N days, defaulting to 30. To change this, set the days URL parameter:
http://stats.wordpress.com/csv.php?api_key=<api_key>&blog_uri=<blog_uri>&table=referrers_grouped&days=<num_days>
searchterms
CSV
"date","searchterm","views"
"2014-01-28","encrypted_search_terms",190
JSON
[{"date":"2014-01-30","searchterms":[]},{"date":"2014-01-29","searchterms":[{"searchterm":"encrypted_search_terms","views":159},{"searchterm":"dynamically load property file in mule","views":2}]}]
XML
<searchterms>
    <day date="2014-01-30"></day>
    <day date="2014-01-29">
        <searchterm value="encrypted_search_terms" count="" limit="100">159</searchterm>
        <searchterm value="dynamically load property file in mule" count="" limit="100">2</searchterm>
    </day>
</searchterms>
clicks
CSV
"date","click","views"
"2014-01-28","http://grab.by/grabs/b608b9c315119ca07a1f7083aabbb9c7.png",3
JSON
[{"date":"2014-01-30","clicks":[]},{"date":"2014-01-29","clicks":[{"click":"http:\/\/www.anddev.org\/extended_checkbox_list__extension_of_checkbox_text_list_tu-t5734.html","views":2},{"click":"http:\/\/android.amberfog.com\/?p=296","views":2}]}]
XML
<clicks>
    <day date="2014-01-30"></day>
    <day date="2014-01-29">
        <click value="http://www.anddev.org/extended_checkbox_list__extension_of_checkbox_text_list_tu-t5734.html" count="" limit="100">2</click>
    </day>
</clicks>
videoplays
I am not sure what this format is as I have no video plays on my blog.
Conclusion
I hope you find this useful. I’ll make another post later showing how to crunch some of this data and extract meaningful information from the raw data.
Slips vs mistakes – what WordPress gets wrong that Blogger and Tumblr get right
You’ve just finished a blog post and are in the process of scheduling it to go out at a certain time to maximize exposure. You click the confirmation button, only to see your post go live immediately rather than the time you scheduled.
Oops. What went wrong? This happened to me once (and nearly multiple times) due to poor UI design on WordPress.com. Fortunately I only lost a few potential page views; in other cases early releases of information have cost businesses dearly.
Scheduling a post
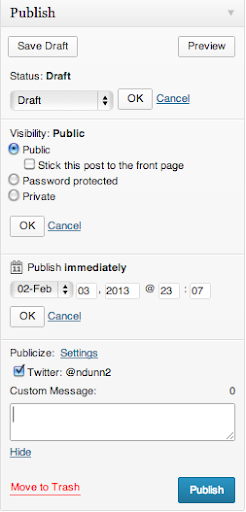
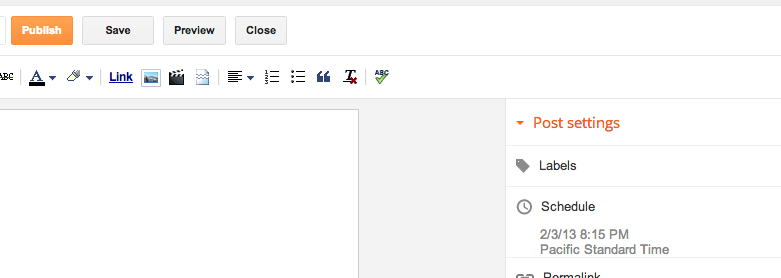
Here is the dialog for publishing on WordPress.
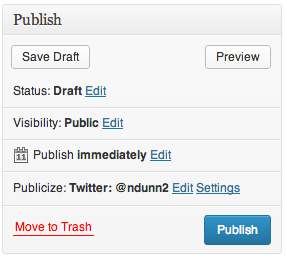
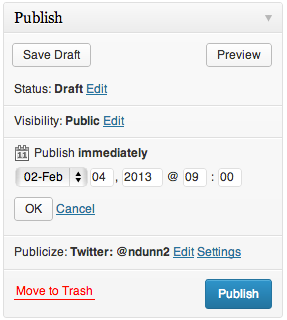
If we click Edit, UI elements reveal themselves for choosing a date and time at which to publish the post.
It was at this point where I pressed the Publish button and my post went live immediately. Do you see what I did wrong?
Slips vs mistakes
From my time in Scott Klemmer’s Human-Computer Interaction (HCI) course, I learned that errors can divided into two classes – slips and mistakes.
A slip is when the user has the correct mental model of the interaction yet makes an error on accident. For instance, if two buttons are close together and you click one rather than the other on accident, that would be a slip. These can often be addressed through things such as making touch targets bigger and adding separation between buttons. From the screenshot, you can see that the Publish button is very large and there’s nothing next to it to accidentally press. (The decision to have the Move to trash button on the same row is rather strange, but it is sufficiently far away that I did not accidentally click on it). This is not the type of error I made.
A mistake stems from the user having the incorrect mental model. That is precisely what happened to me. I did not accidentally press the Publish button; I intentionally pressed it but I had the wrong idea to what would happen. Let’s investigate why.
Convention
What makes interfaces intuitive? Part of it comes from adhering to convention and following the Principle of Least Astonishment. The Wikipedia article sums it up nicely:
In more practical terms, the principle aims to exploit users’ pre-existing knowledge as a way to minimize the learning curve for instance by designing interfaces borrowing heavily from “functionally similar or analogous programs with which your users are likely to be familiar.”
This publishing widget violates conventions in a few ways.
Discarding unsaved user input without warning.
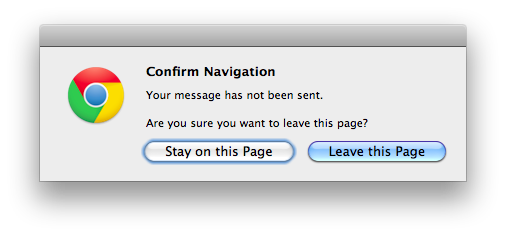
Many programs will warn if you’re about to do something destructive to unsaved input. For instance, if you are half way through a message in Gmail and attempt to close the tab or browser, you will see the popup warning:
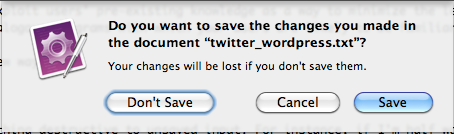
Similarly, all Cocoa applications on Macs will clearly show unsaved state and warn if you try to close a program without saving:

If there are form elements whose state is about to be destroyed by an action, it would make sense to issue a warning about that. This WordPress form does not do the user that courtesy.
Too much state
Most programmers understand that there is state saved on both the server and client. The client will fetch the data from the server and adjust its UI controls to match. Changes to the UI controls don’t automatically get sent to the server; generally there’s some final OK/Cancel action to either accept or discard the changes. Normal users should not need to know this – it should just work. This control exposes too much information unnecessarily. Why would one care what the current server side state is vs what’s in the UI control for each individual section? Why wouldn’t she just set the options the way she likes and hit one button to apply all of the changes?
Even if she understands the distinction between client side and server side state (like I do), it is an extremely unfamiliar interface to have to hit OK on a subsection of a form before finally submitting it. I cannot think of one other example that does this. It is convention that hitting the big Confirm button at the end of a form will use whatever information is currently in the form.
In addition to not expecting to have to hit another OK button in order to have my changes applied, this form suffers an additional problem – there is too little contrast between the OK button and the form. Note how the OK button all but disappears with the least amount of blur:

The eye is naturally drawn towards the big blue button in the lower right, which is exactly what I clicked on.
If I had pressed OK, then the Publish button would have changed its text to “Schedule.” Without knowing that that change would occur, I assumed that this control behaved like all others I had used before and so made the mistake.
Alternatives
Let’s look at alternative blogging sites and see how they do things better.
Blogger
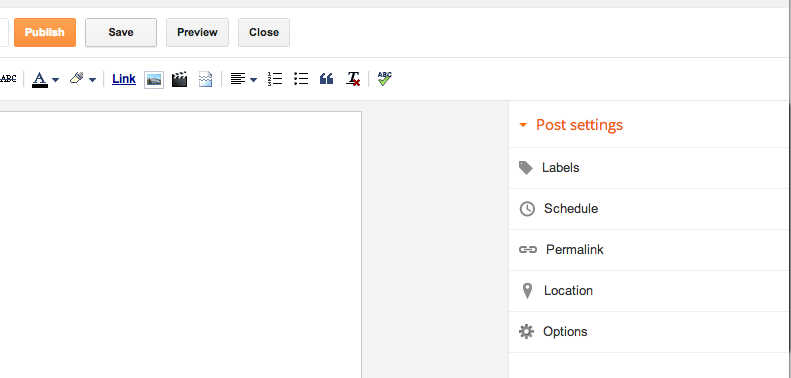
Blogger separates the configuration of the publishing options from the publish button itself.
Once you click on the Schedule button, the Schedule section expands. Note that only one section can be expanded at once, unlike the WordPress widget.
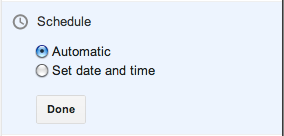
The “Automatic” option really means Now, which should be phrased more clearly. Clicking on the “Set date and time” option brings up a date picker:
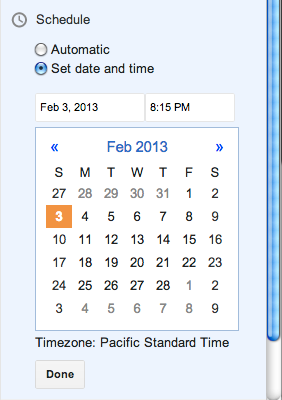
The setting is immediately applied if you click Publish, regardless of whether you have hit Done or not. If you do hit Done, the state is saved and the Scheduling section is collapsed.
There is no Cancel option – if you don’t want to change the date, just put it back to what it was before.
This approach works well. My one complaint is that the Publish text does not change to something akin to Schedule when a date is selected. I had to use trial and error to see what would happen on clicking Publish when a date had been chosen but before the Done button had been pressed – would it publish immediately like WordPress or would it respect the date options? Fortunately it does the most sensible thing and treats the state of the UI controls as the source of truth.
Tumblr
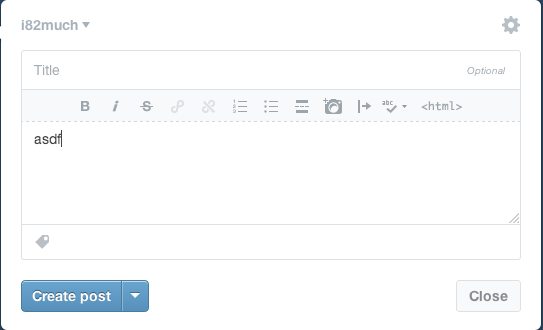
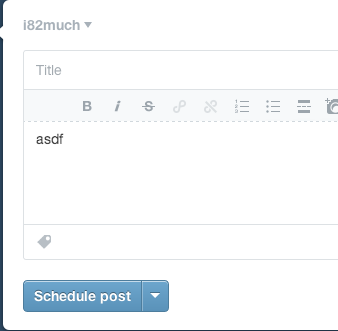
Tumblr takes an approach similar to WordPress but executes it much better. They optimize for the case of immediate publishing, hiding most of the options behind a disclosure button:
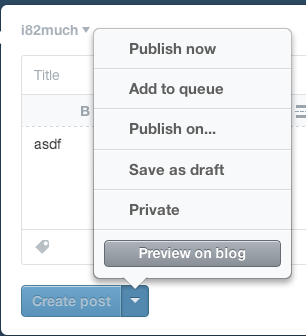
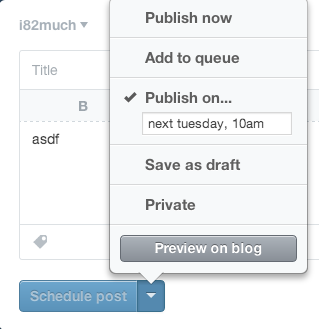
When you click the “Publish on…” menu item, a few things happen. First, there’s a check box next to the item, indicating unequivocally that this is the current selected option. Contrast this with WordPress, which has the confusing case of showing two states in the same area:

Next, notice that the text of the action button immediately changes from “Create post” to “Schedule post”, further cementing the fact that the post will not be immediately created. Finally, note that the button is grayed out and disabled – it cannot be clicked until the menu is dismissed and the changes are implicitly accepted. Once the menu is dismissed, the button is enabled.
This does everything correctly. It optimizes for the most common use case while hiding complexity. It uses bold visual cues to explain the state of the system. It follows conventions and makes it much less likely that the user will make a Mistake – the mental model of the user is much less likely to be at odds with that of the designer.
Conclusion
Understanding the mental model of the user is crucial for user interface designers. The WordPress designers have chosen to expose strange implementation details which make the act of scheduling a future post extremely confusing and error prone. For each option that can be modified, there is a saved state and the current UI state. Each section must be explicitly saved with ‘OK’ in order for changes to take effect. This leads to confusion in the UI because there is contradictory information being shown – on the one hand dates have been chosen but on the other text says ‘Publish Immediately’. If that isn’t confusing enough, the use of OK/Cancel within subsections of a form is not a standard design pattern. Finally, the OK/Cancel options are small and low contrast and thus are less likely to be seen.
I have shown how Blogger and Tumblr address the task of scheduling posts in two different but superior ways to WordPress. Blogger separates the Publish action from the configuration of scheduling, while at the same time making the current state of those settings take place immediately without explicitly confirming the selection. Because of this simplicity, there is no need for cancel or undo button. Tumblr hides the scheduling details behind a button but makes it absolutely clear through both a large checkbox and an immediate change in button text what will happen when you click it.
The general principles to take away from this case study are:
- Keep things simple
- Follow convention
- Update button text immediately when UI changes are made
In my mistake, there was no real harm done. Since this same confusing interface is present for setting privacy options, I can only hope people trying to post privately do not make the mistake I did.
WordPress Stats April Fool’s

WordPress Stats gag
While not as flashy as some other April Fool’s day pranks, WordPress definitely got me for a second.
TextMate – Introduction to Language Grammars: How to add source code syntax highlighting embedded in HTML
I’ve blogged about TextMate a few times in the past, and with good reason – it’s an extremely versatile, light weight, powerful text editor for the Mac. One great feature of TextMate is its extreme customizability. Today I’m going to show how to modify one of the TextMate language files in order to add support for Java code within HTML text.
Why is this useful? My workflow for producing blog posts is often to write the post in TextMate using the Markdown markup language, which I then convert to HTML. WordPress has the ability to syntax highlight and provide a nice monospaced version of sourcecode within a post if it’s delimited by <code></code> tags. While the sourcecode comes out fine in the final post, it would be nice to have the syntax highlighting show up from within the Markdown view (i.e. while I am composing a blog post). Let’s get started by looking at how language grammars work in TextMate.
Introduction to Language Grammar Editing
The language support in TextMate is extremely powerful, but it’s a little complicated to get started. In essence, a language defines a series of rules mapping patterns to scopes. For instance, the Java language grammar defines a scope for comments, a scope for control characters, and so on and so forth. The scope is extremely important for many reasons. A few of them are
- The scope determines whether text is spellchecked or not (a top level scope of
sourceis not spell checked; one that istextwill be) - It provides syntax highlighting, as certain scopes are associated with certain colors.
- Snippets can be targeted to only run when within a certain scope. (See this article on Scope selectors for more.) For instance, all the Java snippets are defined as only being active in the
source.javascope.

As an aside, you might wonder why the scope is called source.java as opposed to java.scope. The reason is that some scope selectors can target the more general case (scope), whereas those concerned with java can target the more specific scope (java.scope).
Since someone has already done the hard work of creating a language definition for Java and for creating all of the snippets that support it, we want to leverage this body of work. All we need to do is ensure that text between the java tags is considered to be part of the source.java scope, and everything will just work.
First, let us look at a sample grammar file. Open up the HTML language definition file by going to Bundles -> Bundle Editor -> Edit Languages, or via the shortcut ⌃ ⌥ ⌘L, and choose the HTML option. You’ll be presented with a rather inscrutable, unstyled document to the right. The first thing you should do, and which I found out the hard way, is copy all that text and paste it into a new document.


When you paste the text into the document, the text is unstyled and interpreted as plain text. In order to force TextMate to interpret this as a language grammar, you must click the item in the lower middle that says “Plain Text” and choose “Language Grammar” from the dropdown box. The document should look a lot nicer after this step:


Take a look through the grammar, but don’t get bogged down in the details. The important thing to look at is the list of patterns defined. Here’s just a small section:
    patterns = (
        {   name = 'meta.tag.any.html';
            begin = '(]*>)';
            end = '(>()';
            beginCaptures = {
                1 = { name = 'punctuation.definition.tag.html'; };
                2 = { name = 'entity.name.tag.html'; };
            };
            endCaptures = {
                1 = { name = 'punctuation.definition.tag.html'; };
                2 = { name = 'meta.scope.between-tag-pair.html'; };
                3 = { name = 'entity.name.tag.html'; };
                4 = { name = 'punctuation.definition.tag.html'; };
            };
            patterns = ( { include = '#tag-stuff'; } );
        }
This is the first pattern that will attempt to match. You don’t need to understand all of it, but you should understand that the parentheses in the regular expressions denote capturing groups, which are then referenced in the beginCaptures and endCaptures tags. These assign scopes to the various captured groups. Note too that we can recursively include patterns (via the include = '#tag-stuff' line) which assign scope to various parts of the matched text. This allows us to define a pattern one time and reference it in multiple places, which cuts down on code duplications.
If you look through the HTML grammar, you’ll notice that some embedded code is automatically detected and set to have the matching text use the corresponding language:
ruby = {
    patterns = (
        {   name = 'comment.block.erb';
            begin = '';
            captures = { 0 = { name = 'punctuation.definition.comment.erb'; }; };
        },
Here, any times the <%# %> tag pair is seen, the entire block is captured and assigned to the scope punctuation.definition.comment.erb, which has the effect of distinguishing it from surrounding text. You can see this in action in the following screenshot:

In addition to the fact that the ERB snippet is syntax highlighted, take note of the popup in the screenshot showing “text.html.basic” and “comment.block.erb”. At any point in any TextMate file, you can hit ⌃ ⇧P (Control Shift P) to get the current scope of the cursor. This is extremely useful for debugging why certain elements are not being selected or assigned the scope you think they are.
Adding Java support
While using a TextMate window to edit the grammar is extremely nice, unfortunately you cannot test your changes interactively here. You must copy and paste the contents back to the original grammar window, overwriting the contents, and then press Test. This will reload the grammar and you will see the change reflected in any window using that grammar currently.
With that in mind, let’s add the support for embedding Java within our Markdown blog posts.
The basic pattern is pretty simple:
    {   name = 'source.java';
        comment = 'Use Java grammar';
        begin = '\';
        end = '\[/sourcecode\]';
        patterns = ( { include = 'source.java'; } );
    }</pre>
</div>
I look for the literal string <code></code> to start the pattern, and then the literal string <code>
 to end it.  I have to escape the brackets due to the fact that they have a special meaning within regular expressions ([aeiou] matches any vowel, while \[aeiou\] matches the literal string [aeiou]).
By adding this line to the top of the patterns, it is run before any of the others.  (Remember, we have to actually add it to the HTML grammar within the Bundle Editor, not just the TextMate window with the grammar inside of it).  Once the line is added and you press Test, the Java highlighting beings to work.
Here’s what a snippet of Java embedded in a Markdown blog post looked like without this change:

And after:

Conclusion
Language support in TextMate is a very complex task, and one that cannot be adequately covered in a single post.  I’ve shown here how to add a small snippet to the HTML grammar to allow syntax highlighting of sourcecode delimited by special blocks.  This technique could be expanded to support any number of other programming languages.
The ability to customize TextMate through editing snippets and language grammars makes it extremely powerful.  I hope this has only whetted your appetite to learn more.  If it has, please see the macromates site which has more information about this.
Stack Overflow profile

